

How it looks now (apart from the carbon grill)
Before I started this project I had spent countless nights camping, either in tents, board bags, with tarp and hammock 'Mears style' or even with the seat wound down in the various cars I have owned. Most more recent trips had been to Cornwall and I had seen so many different styles of camper van. Every night without fail I would be designing mine in my minds eye, with the hope of owning one in the future.
Please understand that the most interior work I had ever done on a car was to change a stereo and speakers, which I found harder to do than this. Trying to get door cards off without damage is a skilled job, ripping interiors out is quite easy.

I bought the van in October 2008, took all the seats out of the back, along with the carpet and other unwanted parts. As the evenings were dark there was not much I could do other than start planning the build with actual measurements and sorting out the curtains/blinds. I did not want conventional blinds, I wanted those that reflected the sunlight back out of the van on hot days as it would be parked a lot at the beach without any cover. I got some reflective material and backed it with a cut up cheap duvet. I was really pleased with the result, although the press studs holding it in the picture did not last long and have now been replaced with bungee cord.
In the darker months I got the alarm fitted and prepared everything, which involved a lot of cleaning and scrubbing. The roof lining is in perfect condition but had 100,000 miles of pollution giving it a varied grey tint near the doors.

By February I had bought most of the raw materials and put tints on the windows. The tints were a lot easier to do than the internet let me to believe. Next time I will use a razor blade to get the windows perfectly clean though, on one window there is a little bit of silver 'speckling' where it was not perfect.

The frame is 'offset' to allow all for boards under one side and sails under the other. The middle support is run at a slight angle to make the rear wider for ease of access for kit, and this makes changing area at the front bigger. It was measured around the actual boards for a good fit. I have at progressed my windsurfing and the boards are now smaller so I can fit 3 sails and two boards for long weekends away all under the left hand side.
All of it is bolted through a hardwood frame into the original holes in the floor where the seats were positioned.
I worked with the original panelling and used secure points to build my frame into or on. This was tricky and will involve a bit of a fiddle to change the rear light bulbs which I expect I will have to do soon.
I placed wood across the 3 main supports about every 25-30cm to make sure that the bed will not up sag in places.

The main boards for the bed were cut to shape ready to be fitted.
When I redesign the interior I will laminate these with cloth and resin to save using the cross beams. It should save weight and gain me enough space to fit a surfboard in with my windsurfing kit.
I wanted to keep a basic camper design for the interior so have part of the bed that slides out allowing for more floor space, you can see the design taking form here.

The material to make the bed was the most costly part so far. I opted for firm grade foam and some 'wine' coloured leatherette, so it would be waterproof and easy to wipe clean of salt and sand.
It is more comfortable than any bed I have ever slept it, so definitely worth the extra cost. I also started to cover the woodwork with carpet to give it all a better finish.

Here you can see the size of the sleeping area, the two smaller parts slide out to create a versatile backrest.


This seating arrangement is not brilliant for anyone tall though. The bed is too high up so all you can do is slouch, which is not a problem after a hard day on the water.

There have been a few changes since I took these pictures 2 years ago. I completely redesigned the kitchen from this which was too big and bulky.
I wanted something that I could easily take out and use outside, this weighed far too much in the end so I made something more simple.
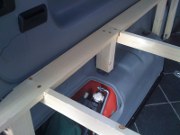
 This shows the kitchen in use, I will post some better ones soon. The idea was to use the 'wasted' space behind the passenger bench seat, creating a cupboard and an area to slide the stove into when not in use. It gives plenty of space for a small set of pans, bits of 'emergency' food and cutlery. The gas bottle is secured underneath. I will develop this design with carbon and glass laminates in the future which will be easier to clean and lighter. It does the job I wanted it to do, and works well.
Regarding all aspects the blog was perfectly nice.
ReplyDeleteOutdoorFederation
A very awesome blog post. We are really grateful for your blog post. You will find a lot of approaches after visiting your post. حسین تهی
Deleteمهراب
امید
A very awesome blog post. We are really grateful for your blog post. You will find a lot of approaches after visiting your post.
ReplyDeleteSummerhaus.com.sg
Diverse discount camping supplies are accessible online. When you scan for online camping supplies, you will see that there is a considerable measure of camping rigging to browse. http://outdoor-equip.net/best-ultralight-backpacking-tent/
ReplyDeleteI respect this article for the very much investigated substance and magnificent wording. I got so included in this material that I couldn't quit perusing. I am awed with your work and aptitude. Much obliged to you to such an extent. outdoor gear world
ReplyDeleteMoreover, the colors will be such that you can never achieve the same décor and textures with other materials. Sometimes the designers get the wood stained or painted to enhance their artistic flavor and beauty. useful site
ReplyDeleteFor a few families, an auto is basically insufficient, and a van is a superior decision, since it can transport more individuals and products effortlessly.Lightweight travel trailer
ReplyDeleteThose are the principle composes or states of tents available today. It tends to be exceptionally precarious attempting to choose the correct tent for your camping needs on the off chance that you don't comprehend the contrasts among them and the focal points or detriments between the distinctive kinds.Used travel trailers in Mo
ReplyDeleteI am upbeat to locate your recognized method for composing the post. Presently you make it simple for me to comprehend and execute the idea. Much obliged to you for the post. https://beautikitchens.com/best-ikea-kitchen-cabinets-reviews/
ReplyDeleteA camping trip can be an exceptionally significant and fun experience, ideally one of numerous that will make them camp again and again. May all your camping vacations and open air exercises be fruitful.Missouri RV Dealer
ReplyDeleteThis comment has been removed by the author.
ReplyDeleteMost camping locales have their own wellspring of intensity so light is generally not an issue. Be that as it may, you may require spotlights or camping lights in the event that brownouts happen. Best 10 Person tent
ReplyDeleteA vital source for the audience that takes the reader step by step.
ReplyDeleteceramic gravity water filter
The tent is the most invaluable piece of equipment that you will take on any camping vacation, it is important that you choose your tent very carefully from the wide selection of tents.best deals on teardrop trailers near me
ReplyDelete